Use LWM2M running on top of a RPL network and M3 nodes
![]() Difficulty: High
Difficulty: High
![]() Duration: 60 minutes
Duration: 60 minutes
Prerequisites: Configure SSH Access / Understand IPv6 subnetting / Get and compile firmware for M3 and A8-M3 nodes / Public IPv6 (6LoWPAN/RPL) network with M3 nodes
Description: The aim of this tutorial is to discover the basics of OMA Lightweight M2M Protocol. You will reserve some M3 nodes on the Grenoble site, set them up with flashing LwM2M client firmware, and create a simple IPv6 network in IoT-LAB. After LwM2M client nodes will register with Leshan Eclispe server and you can understand Object resources model and data.
LwM2M overview
The LwM2M protocol was specified by industry experts in the Device Management Working Group at the Open Mobile Alliance (OMA). LwM2M is a secure, efficient and deployable client-server protocol for managing resource constrained devices. LwM2M uses architectural design based on REST, defines an extensible resource and data model and builds on data transfer standard called the Constrained Application Protocol (CoAP), standardized by the Internet Engineering Taskforce (IETF)

Book and configure LwM2M nodes
- Connect to a site’s SSH frontend
my_computer$ ssh <login>@grenoble.iot-lab.info
- Setup the contiki repository
<login>@grenoble:~$ git clone https://github.com/iot-lab/iot-lab.git
<login>@grenoble:~$ cd iot-lab
<login>@grenoble:~$ make setup-contiki
<login>@grenoble:~$ cd parts/contiki/
- If it is not alreay done, set your credentials for CLI tools with:
<login>@grenoble:~/iot-lab/parts/contiki$ iotlab-auth -u <login>
- Submit a new experiment:
- Duration: 60 minutes
- Choose ten nodes: Archi = m3:at86rf231 / Site = grenoble / Number = 10
Use this command with CLI tools:
<login>@grenoble:~/iot-lab/parts/contiki$ iotlab-experiment submit -n lwm2m -d 60 -l 10,archi=m3:at86rf231+site=grenoble
- Wait for your experiment to be running:
<login>@grenoble:~/iot-lab/parts/contiki$ iotlab-experiment wait
- Get the list of nodes of your experiments:
<login>@grenoble:~/iot-lab/parts/contiki$ iotlab-experiment get -r
{
 "items": [
 {
 ...
 "network_address": "m3-105.grenoble.iot-lab.info",
 "uid": "b576",
 ...
Pick one node that will be later used as Border Router and write down its ID and UID (e.g. m3-105 and b576).
- Choose an available IPv6 prefix for the site you are experimenting on. For example in Grenoble testbed :
- we choose 2001:660:5307:3100::/64
- Launch tunslip6:
<login>@grenoble:~$ sudo tunslip6.py -v2 -L -a m3-105 -p 20000 2001:660:5307:3100::1/64
Note: If you have an error “overlaps with routes”, it’s because another experiment is using the same ipv6 prefix (e.g. : 2001:660:5307:3100::/64).
You can view ipv6 prefix used on the frontend SSH with this command and choose another prefix .
<login>@grenoble:~$ ip -6 route
2001:660:5307:3100::/64 dev tun0  proto kernel  metric 256
fe80::/64 dev eth1  proto kernel  metric 256
fe80::/64 dev eth0  proto kernel  metric 256
- Program your BR node
<login>@grenoble:~/iot-lab/parts/contiki$ cd examples/ipv6/rpl-border-router
<login>@grenoble:~/iot-lab/parts/contiki/examples/ipv6/rpl-border-router$ make TARGET=iotlab-m3
<login>@grenoble:~/iot-lab/parts/contiki/examples/ipv6/rpl-border-router$ iotlab-node -up border-router.iotlab-m3 -l grenoble,m3,105
- From another terminal, ping the Border Router:You can view the border router ipv6 address in the tunslip6 shell
0750.128 Platform starting in 1...
0750.129 GO!
0750.129 [in clock_init() DEBUG] Starting systick timer at 100Hz
0750.131
0750.131 *** Address:2001:660:5307:3100::1 => 2001:0660:5307:3100
0750.173  Starting 'Border router process' 'Web server'Got configuration message of type P
0750.173 Setting prefix 2001:660:5307:3100::
0751.130 Server IPv6 addresses:
0751.130  2001:660:5307:3100::b576
0751.131  fe80::b576
<login>@grenoble:~$ ping6 2001:660:5307:3100::b576
- Choose one LwM2M client node picking another node (here node 108 and uid 8477). Open a new terminal and read serial port output
<login>@grenoble:~$ nc m3-108 20000
- Program your LwM2M client nodes (iotlab-node -e option = flash firmware except BR node)
<login>@grenoble:~/iot-lab/parts/contiki$ cd examples/iotlab/07-lwm2m-example
<login>@grenoble:~/iot-lab/parts/contiki/examples/iotlab/07-lwm2m-example$ make TARGET=iotlab-m3
<login>@grenoble:~/iot-lab/parts/contiki/examples/iotlab/07-lwm2m-example$ iotlab-node -up lwm2m-example-client.iotlab-m3 -e grenoble,m3,105
- Get the list of neighbors and links from the Border Router:
<login>@grenoble:~$ lynx -dump http://[2001:660:5307:3100::b576]
 Neighbors
fe80::a775
fe80::9382
fe80::b179
fe80::b468
fe80::9881
fe80::1062
fe80::a770
fe80::8477

   Routes
2001:660:5307:3100::b468/128 (via fe80::b468) 1666s
2001:660:5307:3100::1062/128 (via fe80::1062) 1601s
2001:660:5307:3100::a770/128 (via fe80::a770) 1494s
2001:660:5307:3100::a775/128 (via fe80::a775) 1485s
2001:660:5307:3100::9382/128 (via fe80::9382) 1408s
2001:660:5307:3100::b179/128 (via fe80::b179) 1152s
2001:660:5307:3100::9881/128 (via fe80::9881) 816s
2001:660:5307:3100::8477/128 (via fe80::8477) 813s
- Ping6 LwM2M client node:
<login>@grenoble:~$ ping6 2001:660:5307:3100::8477
- Verify on the serial port output that the LwM2M client has registered with the LwM2M server (eg. Eclipse Leshan)
<login>@grenoble:~$ nc m3-108 20000
Platform starting in 1...
GO!
[in clock_init() DEBUG] Starting systick timer at 100Hz
 Starting 'IoT-LAB LWM2M client example'
RD Client started with endpoint '?ep=M3000000008477'
Registering with [2001:660:5307:3200::2]:5683 lwm2m endpoint '?ep=M3000000008477': '<3/0>,<3303/0>,<3311/0>,<3313/0>,<3314/0>,<3334/0>,<3341/0>'
LwM2M server and objects resources model
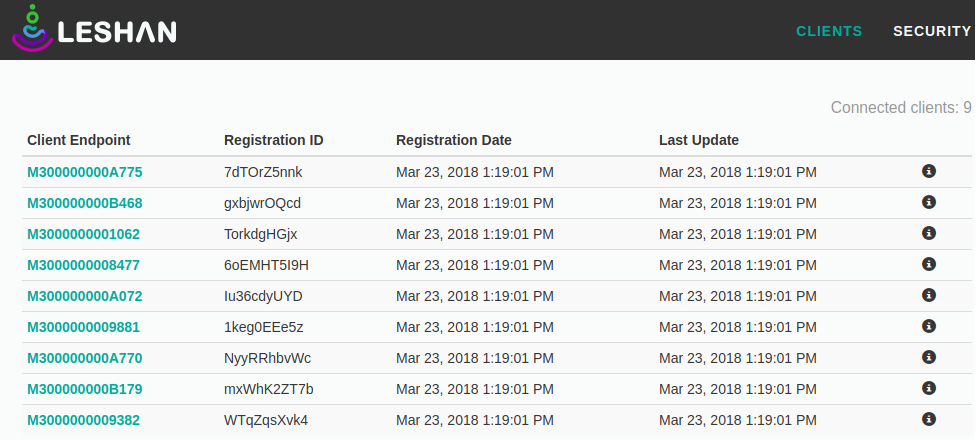
- Go to Leshan server web interface and visualize the clients list. You can view all LwM2M client nodes with a client endpoint like M300000000<uid>
- Select one client and visualize the instance tab. You shoud get two attributes like “Manufacturer” and “Model Number” with Read button.
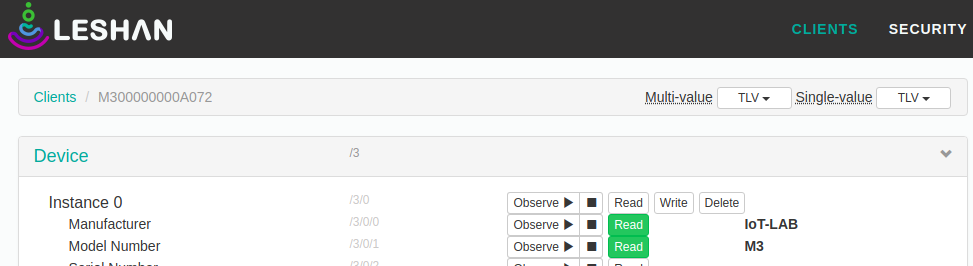 These parameters are mapping in the firmware with Contiki project-conf.h file variables
<login>@grenoble:~/iot-lab/parts/contiki/examples/iotlab/07-lwm2m-example$ cat project-conf.h
//////////LWM2M DEVICE//////////////

#ifndef LWM2M_DEVICE_MANUFACTURER
#define LWM2M_DEVICE_MANUFACTURER "IoT-LAB"
#endif

#ifndef LWM2M_DEVICE_TYPE
#define LWM2M_DEVICE_TYPE "STM32F103REY"
#endif

#ifndef LWM2M_DEVICE_MODEL_NUMBER
#define LWM2M_DEVICE_MODEL_NUMBER "M3"
#endif
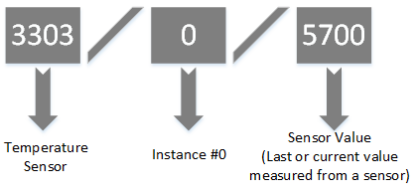
- LwM2M objects/resources are accessed with simple URIs: /{Object ID}/{Object Instance}/{Resource ID}. For example with temperature
 The LwM2M technical specification itself defines eight objects; the repository contains many more contributed by IPSO alliance, oneM2M, and from vendors. You can view the temperature object XML definition here and view the table below:
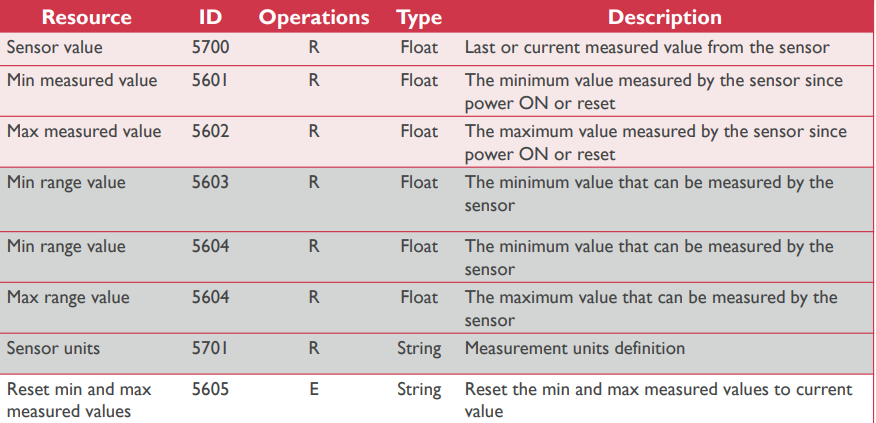 Go to temperature object tab and read resources on Leshan interface. You can also use observe instead of read request on the sensor value resource and it will be update automatically every 30 seconds. Whenever the state of a resource changes, the client notifies each server registered as observer for the resource.
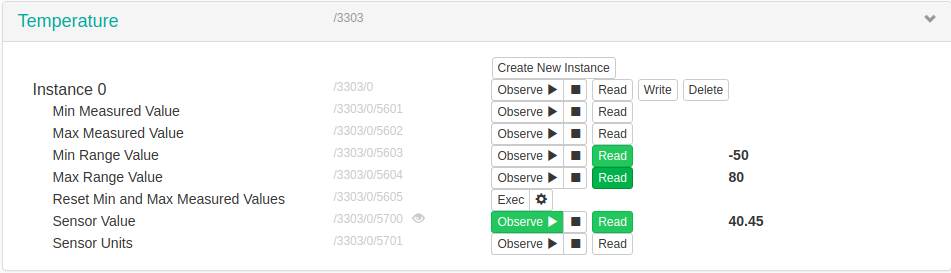 Indeed in the firmware code you should see a timer which handle temperature object notification
<login>@grenoble:~/iot-lab/parts/contiki/examples/iotlab/07-lwm2m-example$ cat lwm2m-example-client.c
  etimer_set(&timer, CLOCK_SECOND *30);

  while(1) {
    PROCESS_WAIT_EVENT();
    if (ev == PROCESS_EVENT_TIMER) {
      /* Call the temperature object handler */
      object_temperature_handle();
      etimer_restart(&timer);
    }
Moreover you should visualize the IPSO temperature object definition in the source code with the handle method
<login>@grenoble:~/iot-lab/parts/contiki/examples/iotlab/07-lwm2m-example/ipso-objects$ cat obj-temperature.c /*---------------------------------------------------------------------------*/ LWM2M_RESOURCES(temperature_resources, /* Temperature (Current) */ LWM2M_RESOURCE_CALLBACK(5700, { temp, NULL, NULL }), /* Min Range Value */ LWM2M_RESOURCE_FLOATFIX(5603, TEMPERATURE_MIN), /* Max Range Value */ LWM2M_RESOURCE_FLOATFIX(5604, TEMPERATURE_MAX), /* Units */ LWM2M_RESOURCE_STRING(5701, "Cel"), ); LWM2M_INSTANCES(temperature_instances, LWM2M_INSTANCE(0, temperature_resources)); LWM2M_OBJECT(temperature, 3303, temperature_instances); /*---------------------------------------------------------------------------*/ void object_temperature_handle(void) { printf("Notify observer temperature sensor\n"); lwm2m_object_notify_observers(&temperature, "/0/5700"); } - Go to leds object tab in leshan interface. Try ro read resources Colour (Green by default) and sensor units. If you see the object XML definition you can see that the resource Colour is in read/write mode. So choose Colour (Red or Blue) and try to write the resource.View the source code of leds object and understand how you can write the On/Off resource.
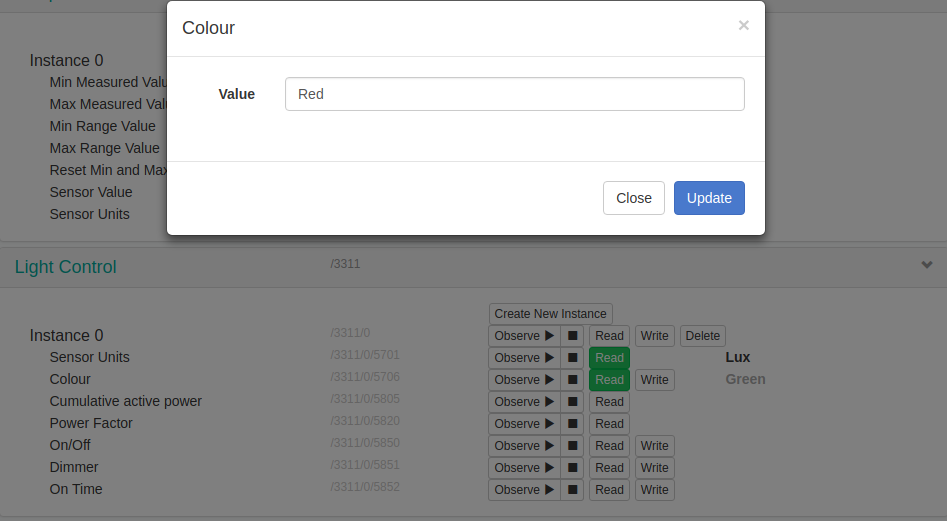
<login>@grenoble:~/iot-lab/parts/contiki/examples/iotlab/07-lwm2m-example/ipso-objects$ cat obj-leds-control.c /*---------------------------------------------------------------------------*/ LWM2M_RESOURCES(leds_control_resources, LWM2M_RESOURCE_CALLBACK(5850, { read_state, write_state, NULL }), LWM2M_RESOURCE_CALLBACK(5706, { read_color, write_color, NULL }), /* Units */ LWM2M_RESOURCE_STRING(5701, "Lux"), ); LWM2M_INSTANCES(leds_control_instances, LWM2M_INSTANCE(0, leds_control_resources)); LWM2M_OBJECT(leds_control, 3311, leds_control_instances); /*---------------------------------------------------------------------------*/ - You can test the last object tab with “Addressable Text Display” object. The idea is to interact with the serial port of the LwM2M client node. For this purpose you must find the node name which corresponding to client endpoint. In this example we use client M3000000008477 (eg. m3-108). Firstly you can read “Text” resource on leshan web interface and verify that you have no serial input. After write on the serial port of the node “Hello World!” and read again “Text” resource to see the update value in leshan interface
<login>@grenoble:~$ nc m3-108 20000
Hello World!
Next try observe button and write on serial port to verify that the “Text” resource is updated automatically. Finally use Write button in leshan interface and visualize that your string is print on serial port
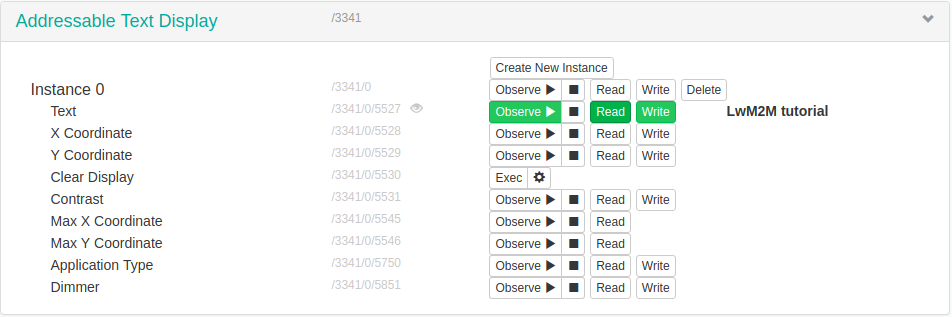
View in the source code the serial event handler and the “Addressable Text Display” object to understand the behaviour.
<login>@grenoble:~/iot-lab/parts/contiki/examples/iotlab/07-lwm2m-example$ cat lwm2m-example-client.c
while(1) {
    PROCESS_WAIT_EVENT();
    ...
    if(ev == serial_line_event_message) {
      obj_serial_data = (char*)data;
      /* Call the serial object handler */
      object_serial_handle();
    }
<login>@grenoble:~/iot-lab/parts/contiki/examples/iotlab/07-lwm2m-example/ipso-objects$ cat obj-serial.c /*---------------------------------------------------------------------------*/ LWM2M_RESOURCES(serial_resources, /* serial text */ LWM2M_RESOURCE_CALLBACK(5527, { read_serial, write_serial, NULL }), ); LWM2M_INSTANCES(serial_instances, LWM2M_INSTANCE(0, serial_resources)); LWM2M_OBJECT(serial, 3341, serial_instances); /*---------------------------------------------------------------------------*/ void object_serial_handle(void) { printf("Notify observer serial sensor\n"); lwm2m_object_notify_observers(&serial, "/0/5527"); }
Congratulations you have finished the tutorial!!!!